The embedded Linux boot process takes a device from power-off to a fully working system through a series of well-defined steps. First, each stage plays a critical role, including hardware setup, firmware execution, and loading the operating system. In this blog, we explore the embedded Linux boot process in simple terms. Specifically, we cover the Boot ROM, bootloaders like MLO and U-Boot, and how the Linux kernel starts up. Whether you’re a beginner or a pro, this guide helps you understand and optimize embedded systems. Now, let’s dive in!
Power on Reset and Boot ROM
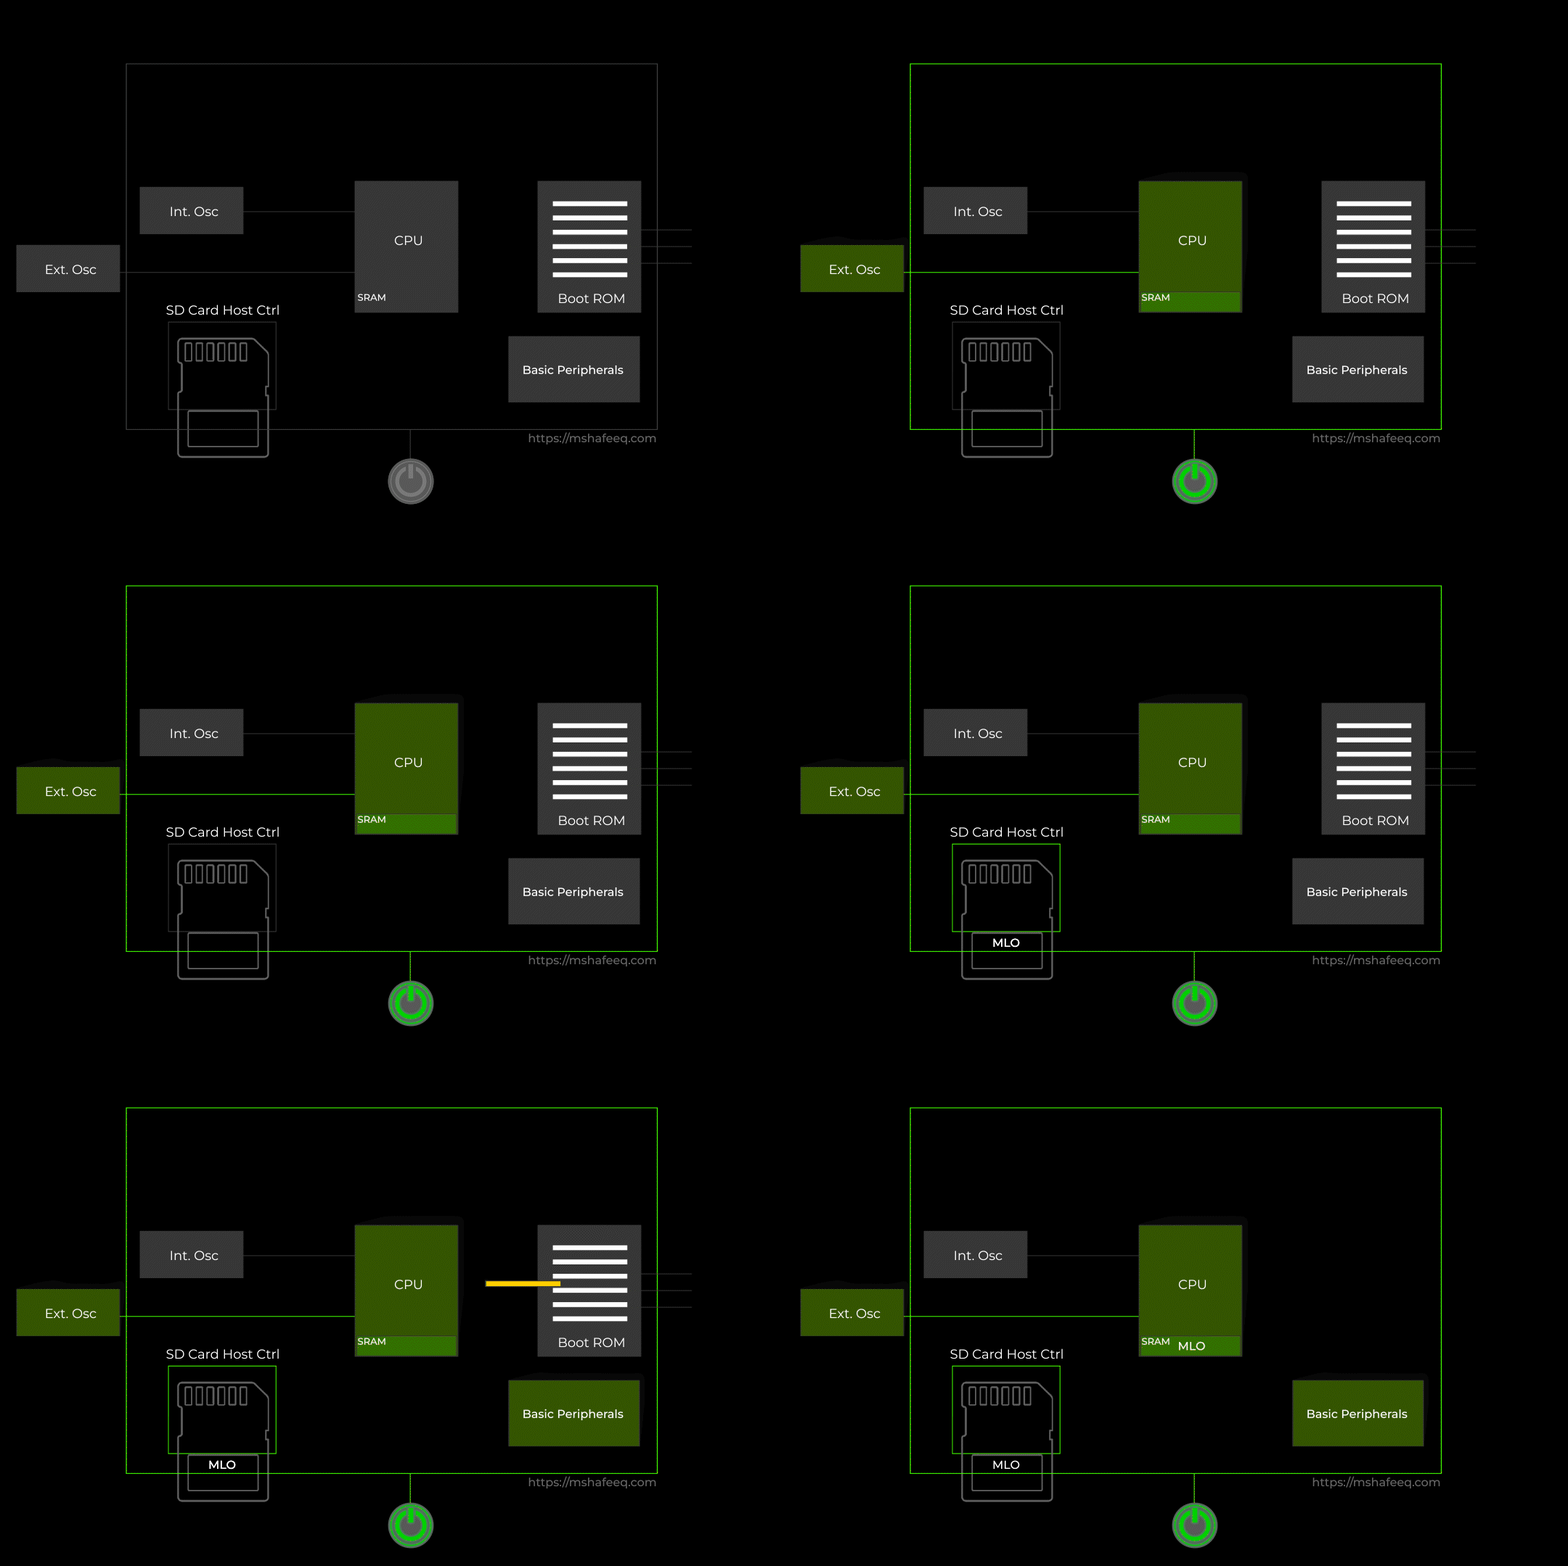
When you power on an embedded device, the Power-On Reset (POR) circuit triggers a hardware reset. As a result, this reset initializes the CPU to a known state. Next, the CPU starts running using a basic default clock, typically an internal low-speed oscillator. Then, it fetches its first instructions from a predefined memory address, which points to the Boot ROM.

The Boot ROM is a small piece of read-only memory built into the CPU or SoC. It contains the first set of firmware instructions. For example, the Boot ROM sets up essential hardware. Additionally, it configures the system clock, which may involve selecting and setting up PLLs (Phase-Locked Loops), external high-speed crystals, or other clock sources. Furthermore, it initializes memory controllers and prepares the system to load the next stage, such as the first-stage bootloader.
The boot ROMs also determine which storage device to boot from (e.g., SD card, NAND flash, eMMC). This is often done by reading configuration fuses or specific GPIO pins.
Interestingly, the Boot ROM operates without needing external RAM. Instead, it relies entirely on the CPU’s internal resources, like on-chip memory and registers. This self-contained design allows the Boot ROM to execute critical initialization tasks independently. These tasks include setting up the system clock, memory controllers, and basic hardware peripherals. Most importantly, it accomplishes all this without requiring external memory to be ready.
The CPU undergoes progressive initialization at different stages because each stage has unique requirements. The system gradually configures the CPU to transition from a minimal startup state to a fully operational system.
At this stage, the Boot ROM performs essential initialization of the SD Card Host Controller. Its sole purpose is to detect the SD card, locate the MLO (SPL), and load it into SRAM for execution.
First Stage Boot Loader
After the Boot ROM, the embedded Linux boot process transitions to the first-stage bootloader—a minimal, hardware-specific firmware like SPL (Secondary Program Loader), MLO (used in Texas Instruments processors), or X-Loader (for older TI OMAP systems). These bootloaders are stored in a dedicated boot partition on non-volatile storage such as an SD card, eMMC, or SPI flash. The Boot ROM determines which storage device to search by reading boot mode pins (strapping pins) or following a predefined boot order (e.g., SD card → SPI flash → eMMC → UART).

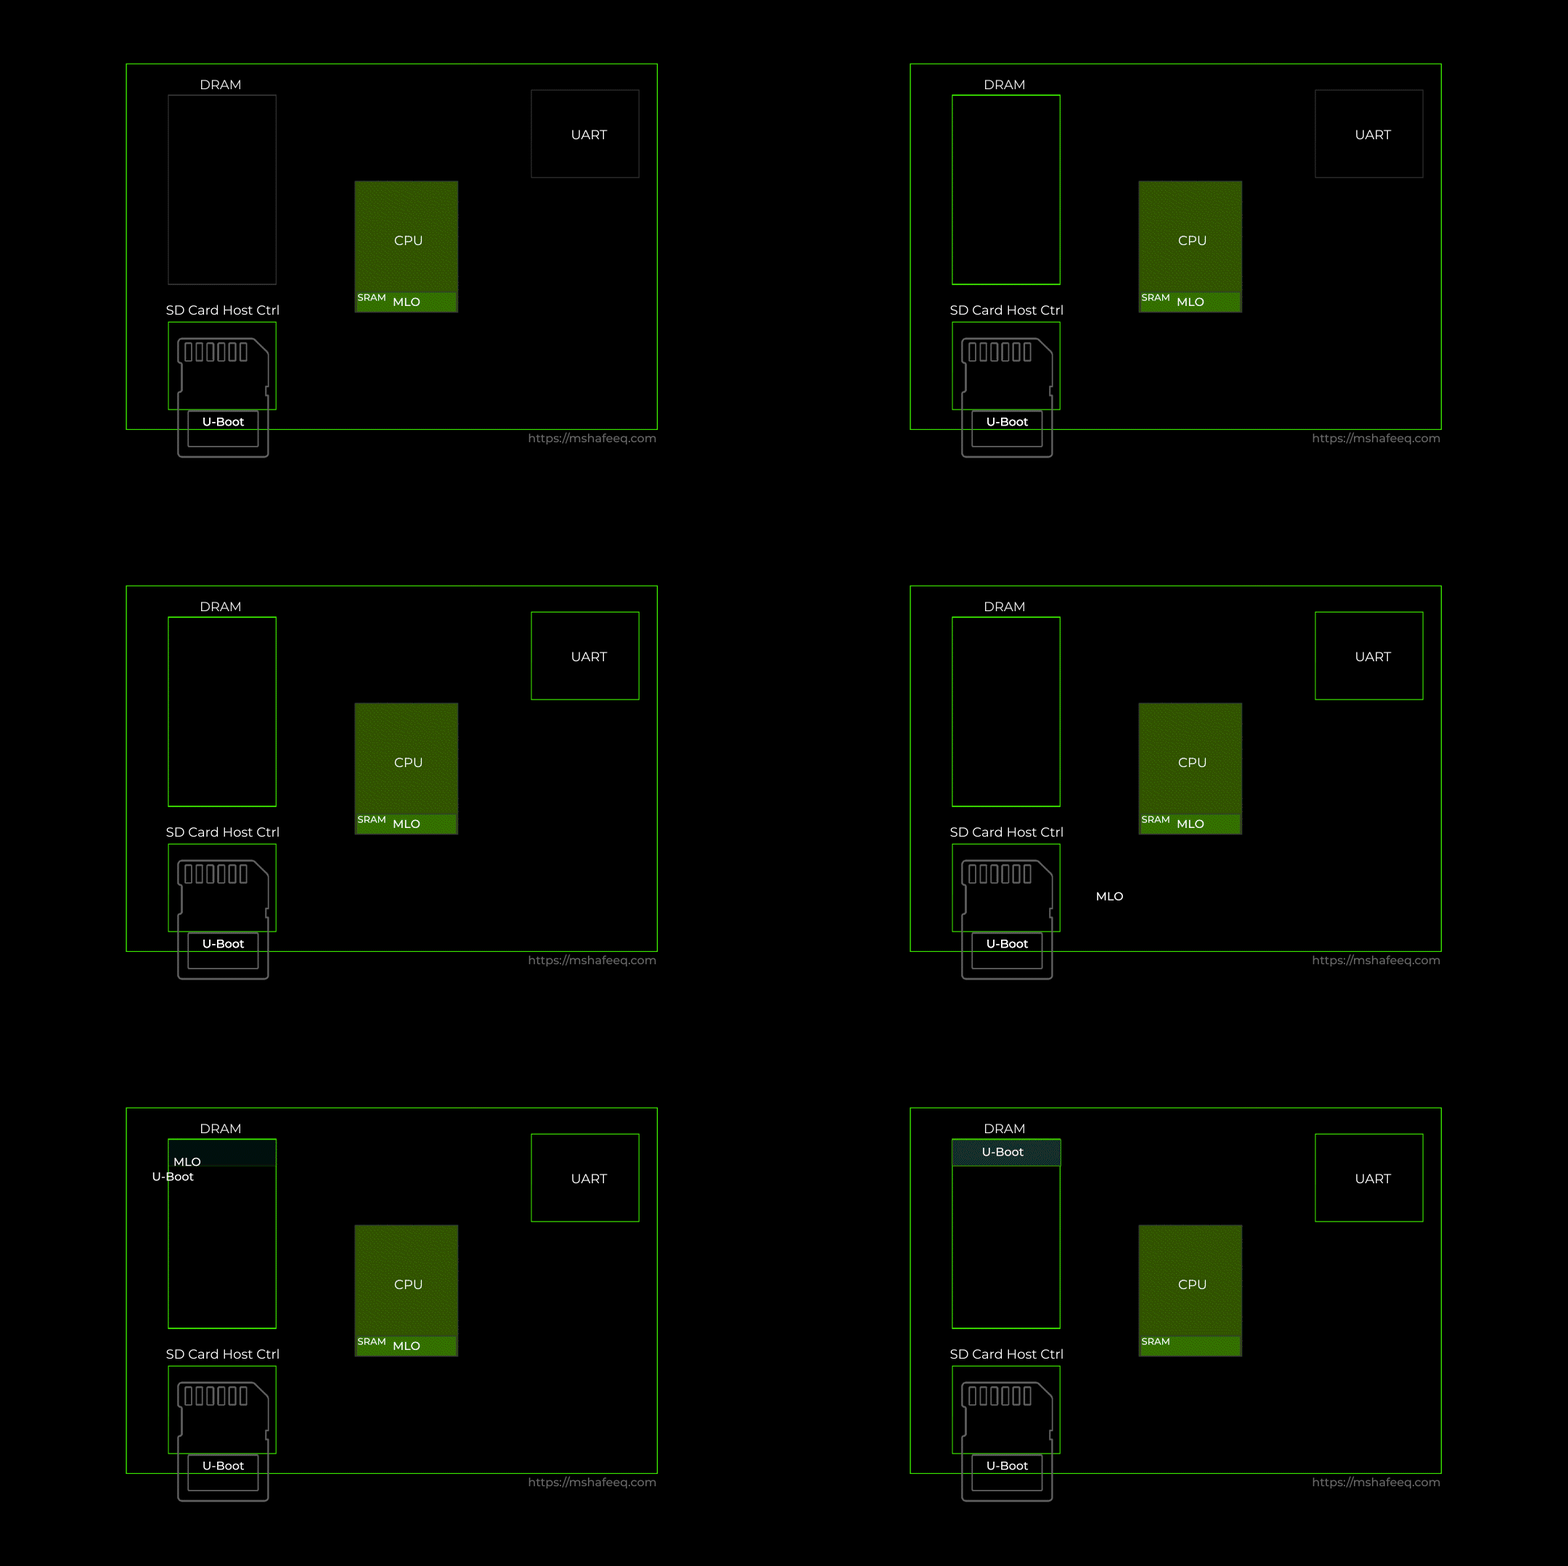
During boot, the Boot ROM initializes the memory controller for the selected storage device, enabling the first-stage bootloader to read from non-volatile storage. It then copies the first-stage bootloader (e.g., MLO) into the CPU’s internal SRAM (static RAM), a small on-chip memory (typically 64–128 KB), since external DRAM is inactive at this stage. Once loaded into SRAM, the first-stage bootloader executes and performs critical tasks:
- Initializes external DRAM (e.g., DDR3/DDR4) by configuring memory controllers and timing parameters.
- Initialize UART for debug console. But the minimal UART initialization will be done in boot ROM stage in some rere case.
- Loads the second-stage bootloader (e.g., U-Boot) from storage into the newly initialized DRAM.
- Verifies firmware integrity via digital signatures (if secure boot is enabled).
For example:
- MLO (used in TI AM335x chips) resides in the “boot” partition of an SD card. The Boot ROM loads MLO into SRAM, where it sets up DDR memory, copies U-Boot into DRAM, and transfers control.
- U-Boot SPL (common in ARM systems) is stored in flash memory, runs from SRAM, and bridges the Boot ROM to the full U-Boot.
These bootloaders are vendor-specific and often precompiled in the device’s firmware image, ensuring seamless hardware compatibility.
Second Stage Boot Loader
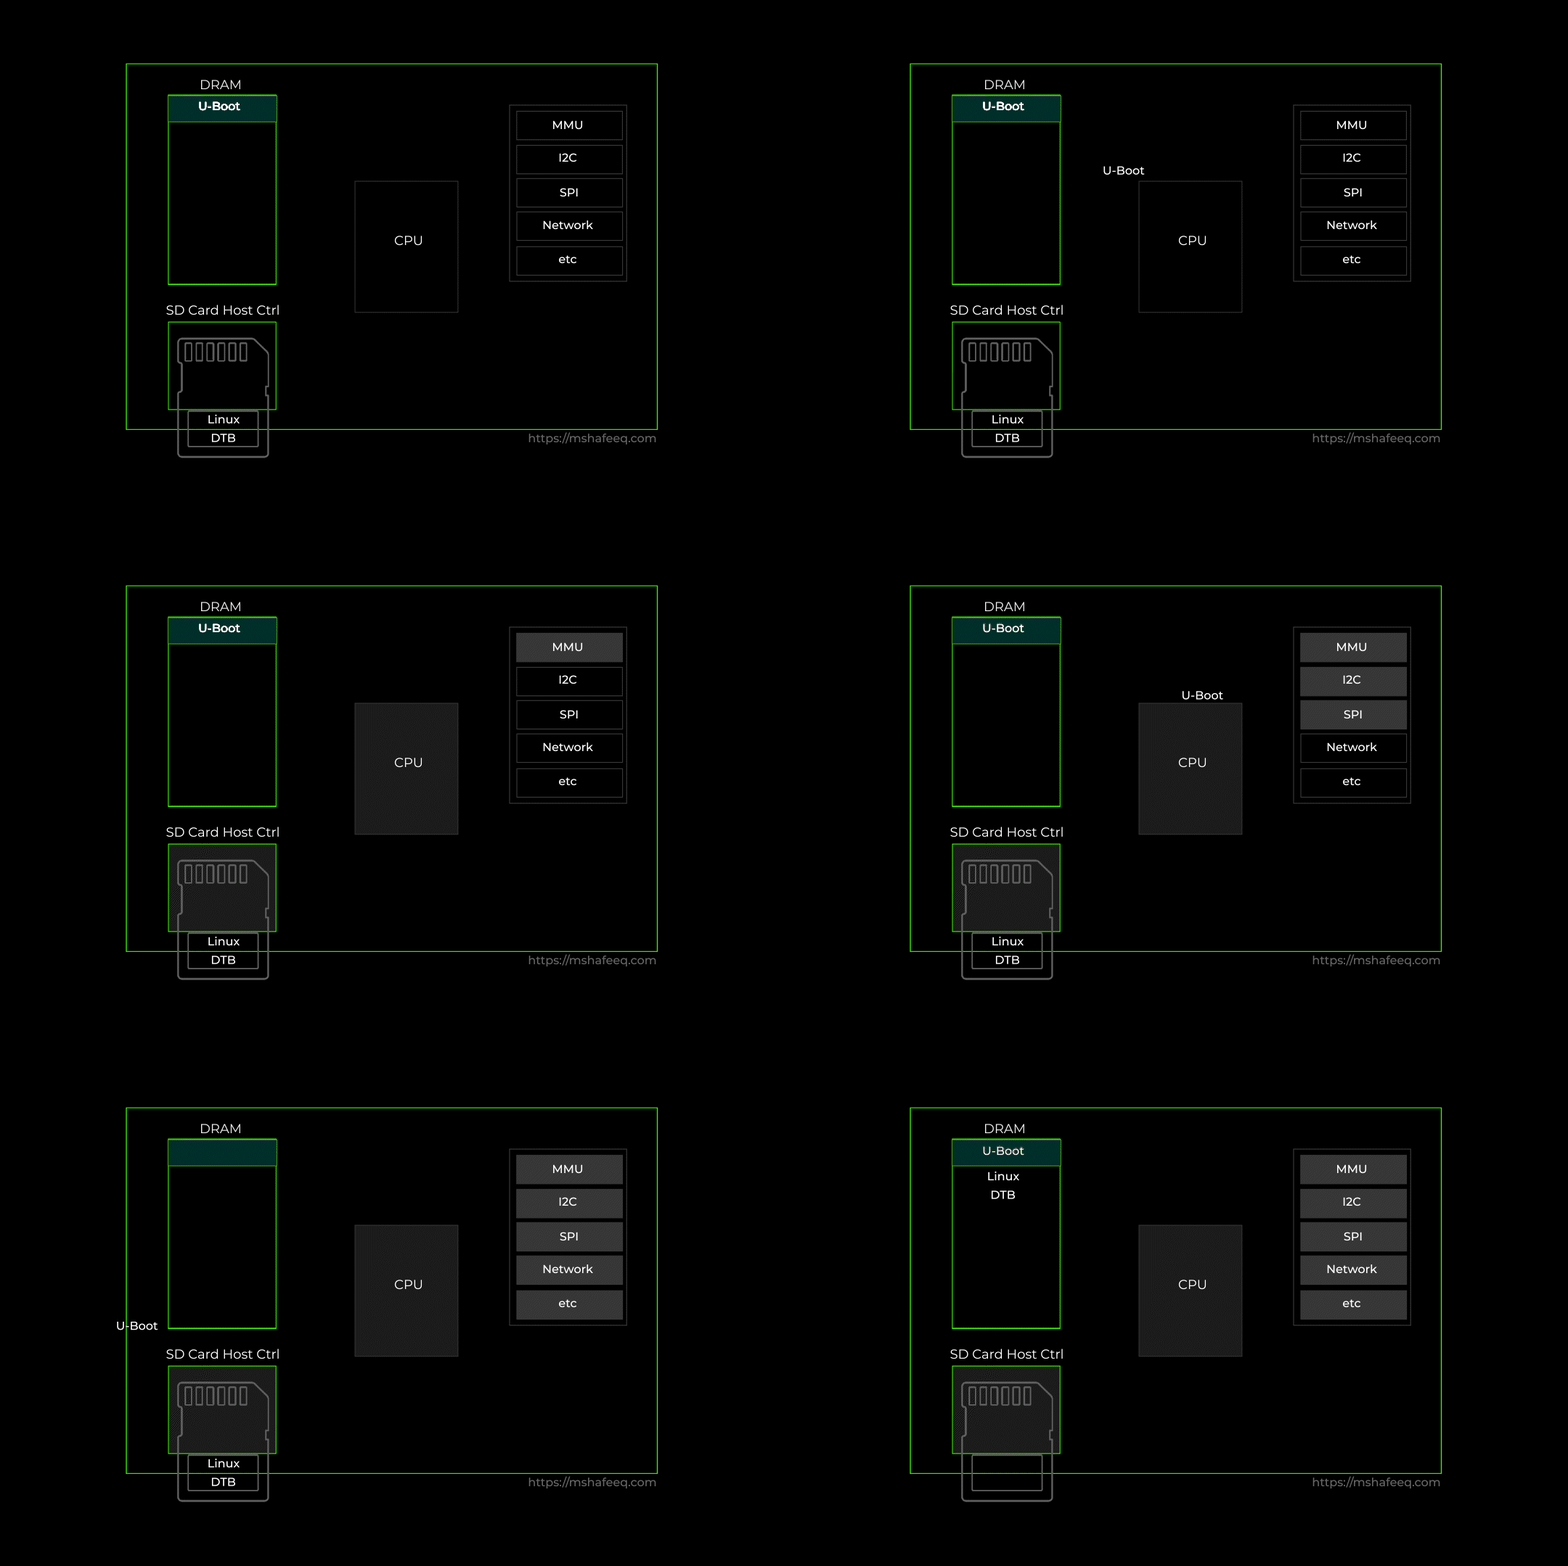
After the first stage bootloader (MLO) initializes the DRAM, it loads the second stage bootloader, such as U-Boot, from non-volatile storage. This storage could be NOR flash, NAND flash, eMMC, or an SD card. If stored on an SD card, the bootloader may be in the /boot partition or a reserved area outside the file system. The CPU then executes U-Boot from DRAM, allowing more advanced boot operations.

Once execution begins, U-Boot sets up storage interfaces, enabling access to NAND, eMMC, SD cards, or other boot media. It then configures the CPU and memory, ensuring stable operation. Next, it initializes essential peripherals, such as I2C, SPI, and network interfaces. With the hardware ready, U-Boot locates the Linux kernel and device tree, typically stored in a boot partition of SD Card or raw flash memory. It loads them into DRAM, prepares the kernel command line arguments, and parses the device tree to configure the hardware accordingly. Finally, U-Boot hands control to the Linux kernel, marking the end of the bootloader’s job and completing the transition from hardware initialization to Linux execution.
Linux Kernel
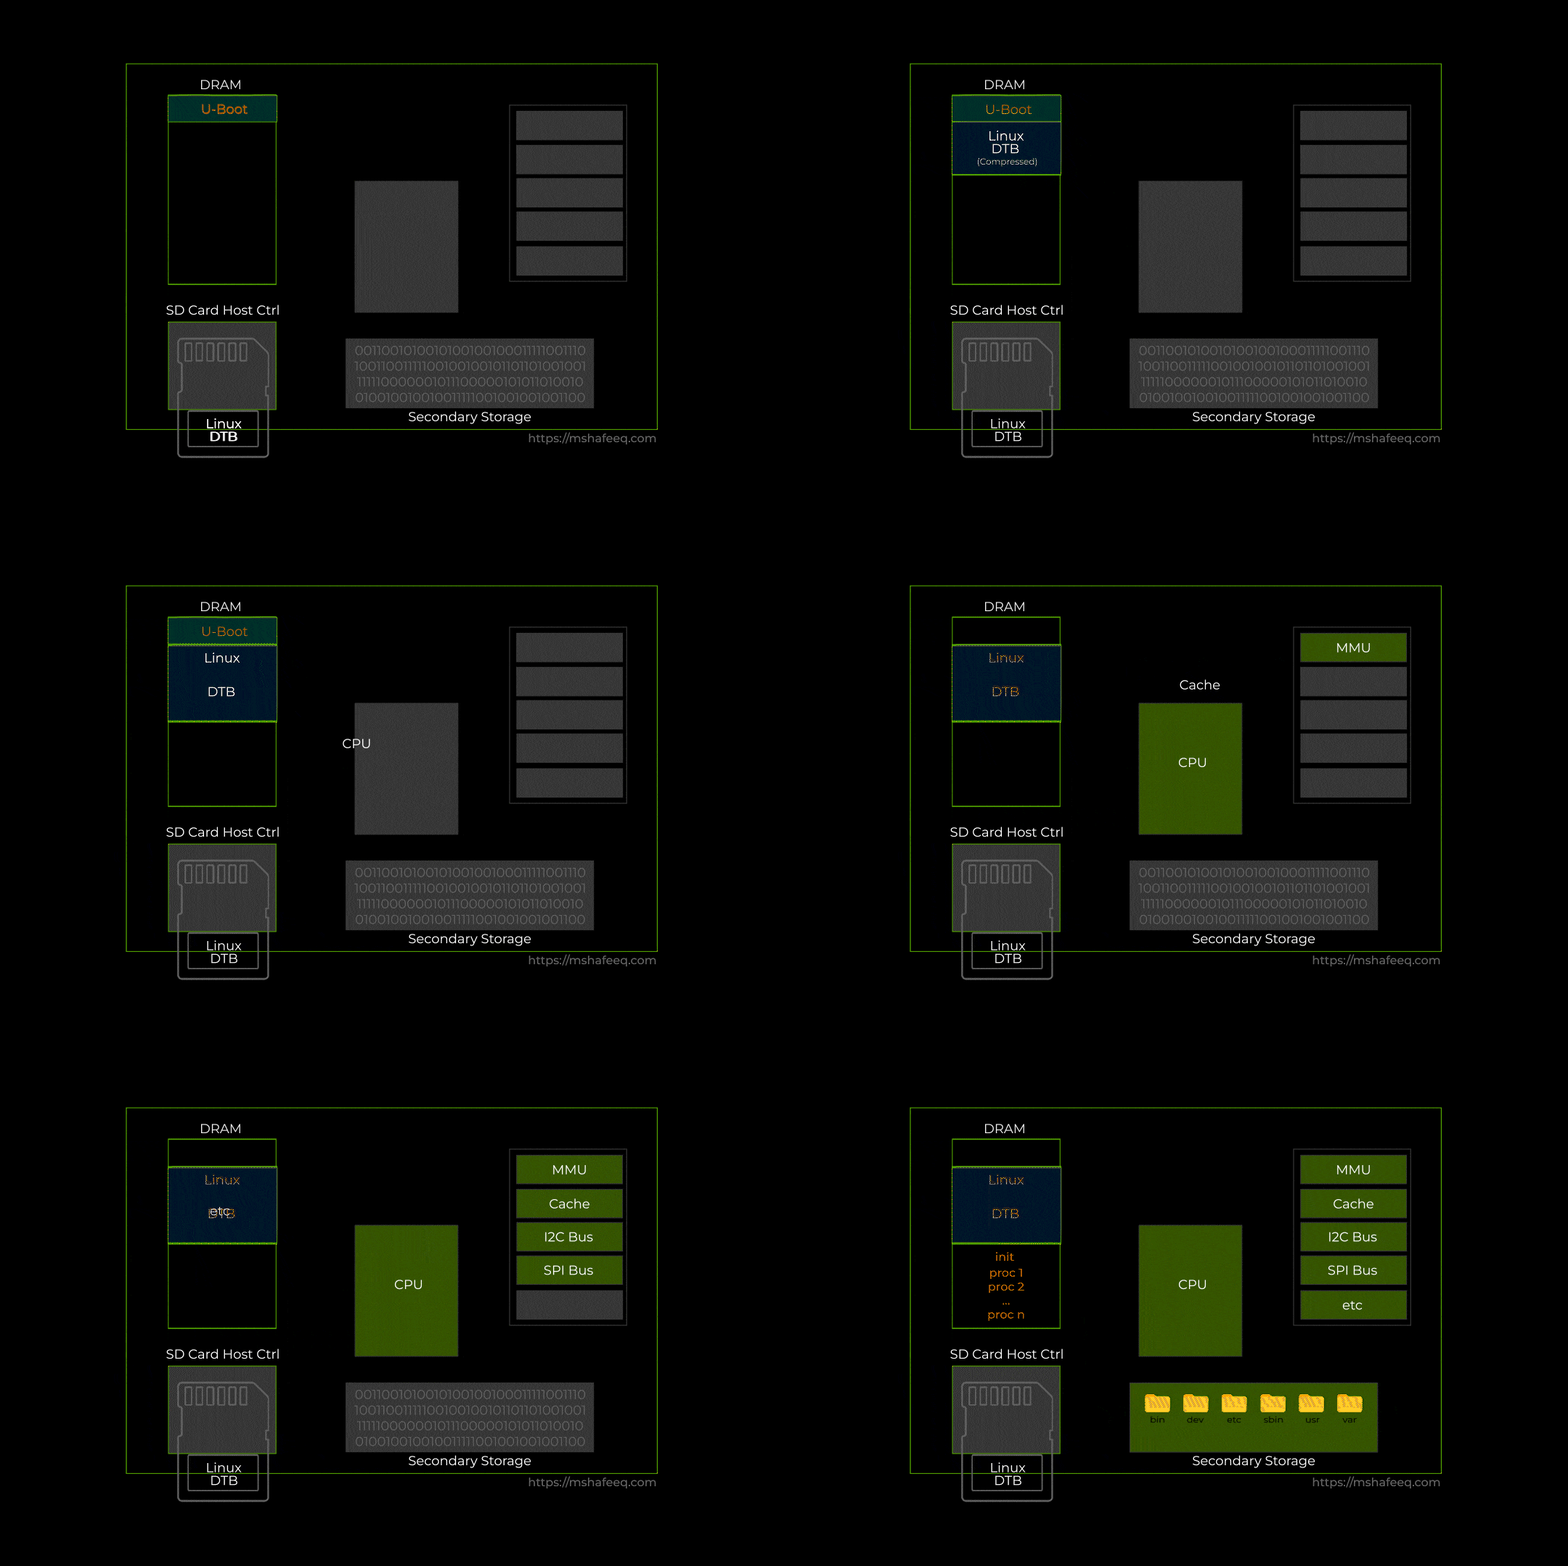
Once the Linux kernel and device tree (DTB) are loaded into DRAM, the CPU takes control and starts executing the kernel. The bootloader, such as U-Boot, transfers execution to the kernel by jumping to its entry point in memory. This transition marks the beginning of the Linux kernel’s operation.

If the kernel is stored in a compressed format (zImage), it first decompresses itself into DRAM. If it is already in an uncompressed format (Image), it runs directly. Decompression helps save storage space while ensuring the kernel loads correctly into memory.
The kernel then initializes the hardware by reading the device tree (DTB). This step helps it understand the available peripherals, memory regions, and other hardware components. It also sets up memory management, configures the Memory Management Unit (MMU), and enables caching to optimize performance. Proper memory management is crucial for stable and efficient system operation.
Once the hardware is initialized, the kernel mounts the root filesystem, which contains essential system files. The filesystem may reside in eMMC, NAND flash, an SD card, or even a network storage (NFS). Without mounting the filesystem, the system cannot access the files needed to continue the boot process.
After mounting the filesystem, the kernel looks for the init process, typically found at /sbin/init or managed by systemd. The init system is the first user-space process and is responsible for starting background services, managing processes, and setting up the system environment. It launches essential services such as networking, logging, and system monitoring, ensuring the system is fully functional.
At this stage, the system is fully operational, and Linux is ready to run applications and user services. This marks the successful completion of the boot process, allowing users and processes to interact with the system seamlessly. 🚀