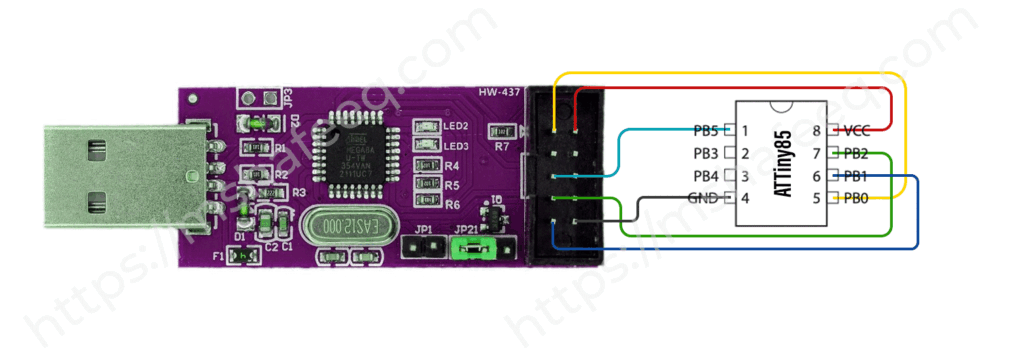
If you’re diving into the world of embedded systems, the ATtiny85 is a fantastic place to begin. It’s compact, cost-effective, and gives you full control over hardware using register-level programming. In this post, you’ll learn how to set up your Ubuntu machine, wire up your ATtiny85 with a USBasp programmer, and write your first bare-metal firmware.
🛠️ What You’ll Need
Hardware
- ATtiny85 Microcontroller
- USBasp Programmer
- Breadboard + Jumper Wires
- LED + 330Ω Resistor (optional for testing)
- 5V Power Source (from USBasp or external)
💻 Setting Up Ubuntu for ATtiny85 Development
Open a terminal and run the following:
sudo apt update
sudo apt install avrdude gcc-avr avr-libc make
These tools provide:
- avrdude – for uploading firmware via USBasp
- gcc-avr – the AVR C compiler
- avr-libc – standard C library for AVR
- make – to automate the build process
🔌 Wiring ATtiny85 with USBasp Programmer
Here’s how to connect your USBasp to the ATtiny85:

💡 Why Register-Level Programming?
Register-level programming gives you:
- Fine-grained control of microcontroller peripherals
- Deeper understanding of what’s happening under the hood
- Minimal, efficient code—great for low-memory systems
📝 Example: Blinking an LED on PB3 (Pin 2)
Here’s a simple program that toggles an LED connected to PB3 (Pin 2) every 500ms.
main.c
#include <avr/io.h>
#include <util/delay.h>

int main(void) {
    DDRB |= (1 << PB3); // Set PB3 as output

    while (1) {
        PORTB ^= (1 << PB3); // Toggle PB3
        _delay_ms(500);      // Delay
    }
}
⚙️ Makefile to Build and Flash
Create a file named Makefile in the same directory as main.c:
MCU=attiny85
F_CPU=1000000UL
CC=avr-gcc
CFLAGS=-mmcu=$(MCU) -DF_CPU=$(F_CPU) -Os
OBJCOPY=avr-objcopy
TARGET=main

all: $(TARGET).hex

$(TARGET).hex: $(TARGET).out
	$(OBJCOPY) -O ihex $< $@

$(TARGET).out: $(TARGET).c
	$(CC) $(CFLAGS) -o $@ $<

flash: $(TARGET).hex
	sudo avrdude -c usbasp -p t85 -U flash:w:$(TARGET).hex

clean:
	rm -f *.out *.hex
🔥 Flash the Program
Once everything is connected and saved, flash your firmware using:
make
make flash
You should see the LED blinking on PB3 (pin 2)!
🧪 Optional: Change Clock Frequency
To run the ATtiny85 at 8 MHz (instead of the default 1 MHz), disable the divide-by-8 fuse:
sudo avrdude -c usbasp -p t85 -U lfuse:w:0xE2:m
⚠️ Be cautious with fuse settings—wrong values can disable programming interfaces.
✅ You’re All Set!
You’ve now set up a complete ATtiny85 development workflow on Ubuntu using USBasp! From here, you can explore:
- Timers and PWM
- External interrupts
- ADC (analog to digital conversion)
- UART (via software or USI)
Stay tuned for upcoming posts diving into these features—all with register-level control!