In this exciting series, we’re diving into the fascinating world of register-level programming with the STM32F103C6T6A microcontroller—an affordable yet powerful board based on the ARM Cortex-M3 architecture. Whether you’re a passionate hobbyist or a professional developer, this hands-on journey is designed to deepen your knowledge and empower your creativity in embedded systems.
Tools You’ll Need
To get started, ensure you have the following essentials:
- STM32F103C6T6A Development Board (Bluepill)
- ST-Link V2 Programmer
- STM32F103x6 Datasheet (Download)
- STM32F103xx Reference Manual (Download)
The datasheet gives you a detailed look at peripherals like GPIO, USART, ADC, and communication protocols. Meanwhile, the reference manual offers a comprehensive overview for the entire STM32F1xxxx family.
Why Choose STM32F103C6T6A?
The STM32F103C6T6A is part of the popular STM32 series from STMicroelectronics. It’s loved by the embedded community for its:
- High-performance ARM Cortex-M3 core
- Rich set of peripherals
- Budget-friendly price
- Great for learning bare-metal programming
Why Develop on Ubuntu (Linux)?
Linux, especially Ubuntu, offers a robust ecosystem packed with powerful tools for embedded development:
- Terminal-based utilities
- Lightweight editors like VS Code and Vim
- Open-source toolchains
- Scripting and automation capabilities
Ubuntu helps streamline your workflow and keeps you closer to the hardware for maximum efficiency and control.
Why Register-Level Programming?
Instead of using HAL or other abstraction libraries, we’ll go low-level by directly manipulating the microcontroller’s registers. Benefits include:
- Deep understanding of hardware behavior
- Faster and more optimized code
- Full control over each operation
If you’re aiming to become a true embedded expert, register-level programming is the path to mastery.
Toolchain Setup on Ubuntu
Let’s set up our build environment using the arm-none-eabi-gcc toolchain:
sudo apt-get update
sudo apt-get install gcc-arm-none-eabi
Verify the installation:
arm-none-eabi-gcc --version
Install ST-Link Tools
To flash the firmware onto your STM32 board, install the ST-Link utility:
sudo apt-get install stlink-tools
Check if it’s working:
st-info --version
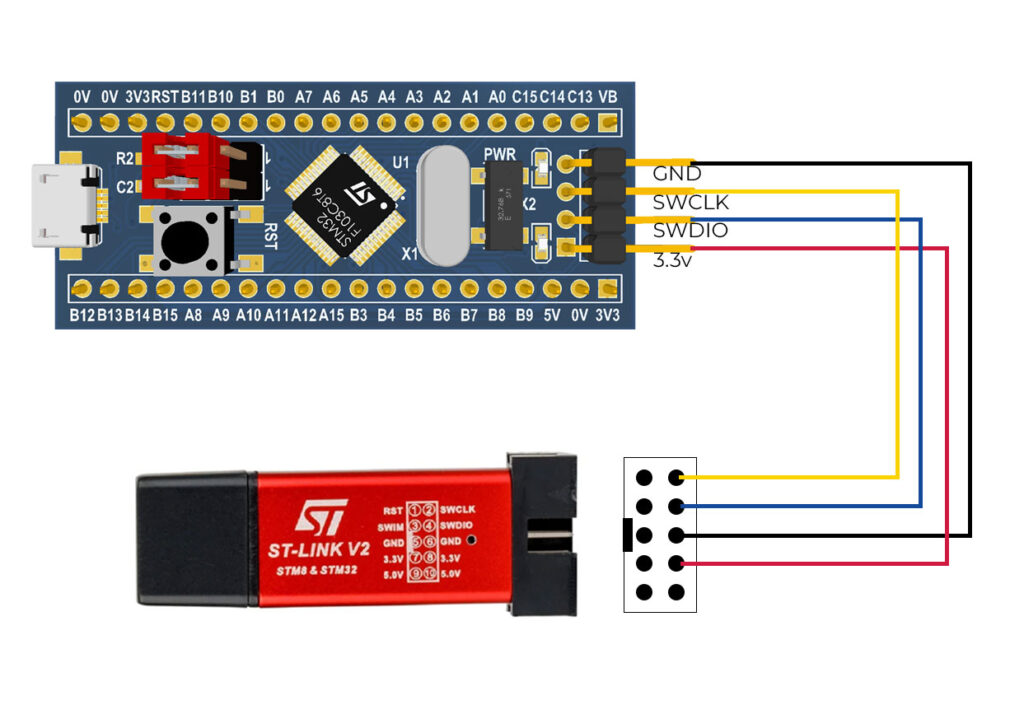
Hardware Setup

First Program: Blinking an LED
We’ll start with a simple LED blink example using STM32CubeMX as the base project (with unnecessary code removed). You can download the starter project here:
🔗 Download LED Blink Project
This project lays the groundwork for future tutorials involving USART, Timers, ADC, and more.
Build the Project
Extract and compile the project with these commands:
mv ~/Downloads/STM32F103x6_Empty_Project.zip /your/project/path/
unzip /your/project/path/STM32F103x6_Empty_Project.zip
cd STM32F103x6_Empty_Project
make
Flash the Firmware
Connect the ST-Link V2 to your STM32 board using 4 wires. The Makefile includes a flashing recipe, so simply run:
make flash
If your board’s built-in LED starts blinking every 1 second, congratulations! 🎉 You’ve successfully completed the initial setup.
Need Help?
If you faced any issues or have questions, don’t hesitate to drop a comment below. I’d be more than happy to help you out.
What’s Next?
This is just the beginning. In the upcoming posts, we’ll unlock more peripherals and go deeper into the power of bare-metal programming. Stay tuned to explore USART, Timers, ADC, and much more with real-time code examples and practical insights.
Final Thoughts
Mastering the STM32F103C6T6A using register-level programming on Linux puts you in control of every byte and bit of your application. It’s a challenging yet incredibly rewarding journey into the heart of embedded systems. So gear up, stay curious, and let’s build something amazing together! 💡💻
Can we use the same project template in windows also?
You cannot use the same project as such. Instead you can open an empty project in CubeMX IDE and remove unnecessary files and then use the content of main.c file in my project.
Let me know if you need further assistance on this.
Pingback: Unlock STM32 GPIO: Simple Guide to Input and Output(GPIO) - The Embedded Engineer
Pingback: STM32F103 ADC Polling method the Easy Way – Register-level Programming - The Embedded Engineer